On Wednesday I sent out my monthly newsletter to those on my subscription list. Every month I try to include a photo of a recent project that I’ve made together with all the news and updates of what’s going on in the Stampin’ Up! world. I also include a link to an exclusive tutorial of how to make one of the projects in the current catalogue(s) – I call it my How Did They Do That tutorial. I won’t be sharing the tutorial today, as only those who subscribe to the newsletter have access to it.
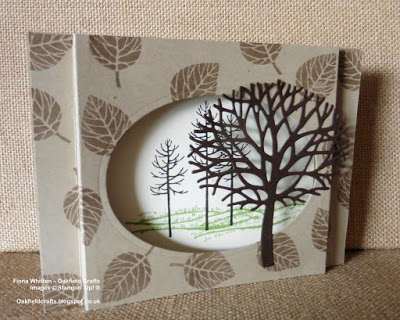
But, this is my project that I featured this month.
As you can probably guess, I used the Thoughtful Branches Bundle to make it.
The card is made using two 14.9 cm x 10.5 cm pieces of Crumb Cake cardstock. This means it will fit into a C6 envelope (Standard UK size card).
Basic directions on how to make the card are as follows:
- Both pieces were scored at 1.5 cm, 2 cm, 12.9 cm and 13.4 cm.
- Cut an oval cut out using the largest of the dies from the Layering Ovals Collection from one piece.
- Stamp leaves in Tip Top Taupe onto the piece of Crumb Cake with the cut out oval.
- Stamp grass (Pear Pizzazz), and trees (Early Espresso) onto a piece of Very Vanilla measuring 10.0 cm x 10.0 cm. Make sure that the grass image is wider than the oval.
- Glue the Very Vanilla piece to the front of the second piece of Crumb Cake (no oval cut).
- Burnish the score lines on both pieces with a Bone Folder.
- Glue top and bottom pieces of Crumb Cake together – just the 1cm wide ends up to the first score line.
- When the glue is dry, gently push the ends towards each other to produce the gap between the front and back pieces where the Very Vanilla sits. You might need to tweak it a bit so that it will stand up.
- Cut an Early Espresso tree using the die from the Beautiful Branches dies (available as part of the bundle or separately) and glue it to the front of the card – be careful not to place the glue where the tree overhangs the cut out oval.
I hope you give this a go.
Details of the products used are as follows:
If you’d like to receive my future monthly newsletters please enter your email address in the subscribe button in the left-hand column. Alternatively send me a quick email asking me to add you. My new Oakfield Crafts email address is fiona@oakfieldcrafts.co.uk. I’m slowly getting around to changing all my stationary but the gmail address still works.
Fiona xx

BEAUTIFUL!!! I can't wait for my Thoughtful branches bundle to come in!!